
The overall goal of the Manipulator Tools Plugin is to empower Blueprint Tool creators with a bit more visual functionality when it comes to changing properties on their BP's. For example there already is a way in blueprint to edit Vectors and Transforms using a built in visual diamond widget. However, that is fairly limited and can get visually cluttered super fast on more complex blueprints.
Features include
4.19 - 4.25 tested and working in editor and shipping builds.
Works as a component on ANY Actor Blueprint.
Can be procedurally added like any other component.
Useful as a way to add a functional RIG inside the editor.
Fully Customizable Shapes and Colors with no limits on how many can be on one manipulator.
Works with Transforms, Vectors, Bools, and Enums
Force Select/Deselect a manipulator and get if manipulator is selected.
Control Visibility by simply setting the component to visible or not.
You can download the Manipulator Tools plugin here!
Getting Started
Installation / Activation ( Docs Coming Soon for those who have never installed a plugin from github )
Using the Manipulator Mode
Manipulators will only show up when the editor mode is activated.


Click Manipulators to select them and SHIFT click the actor to deselect all manipulators. You can also multi-select manipulators by control+clicking them.
Lock Actor Selection - Will keep your current selection locked until you uncheck this box. This is intended to be used if you know you are gonna be editing the selected actors for quite awhile and don't want to risk accidentally deselecting them.
Use Safe Deselect - When checked on, this will make it so AFTER moving a manipulator, it will take 2 non-manipulator clicks to deselect your object. This can be very helpful if you find yourself accidentally misclicking when trying to select manipulators.
Adding a Manipulator to your blueprint.
Manipulators are available through any Actor Component.
Open up your blueprint and add an "Instance Editable" Property that you would like to manipulate.

The Eyeball means it is instance editable
For our case we will hook into the Transform property which I've named "Transform". To do this we will add a new Manipulator Component to our blueprint. I like to use the naming convention of MC_ for any of my Manipulator Components.

Then from here you can click on MC_Transform in the component list and take a look at Settings in the details panel. For now we will simply go to the Property dropdown and Enter "Transform" into the Name To Edit

Now you can place this actor in the world, select it, and switch to the manipulator mode in the modes panel.
What you should see is a blue box that you can click on and move around!
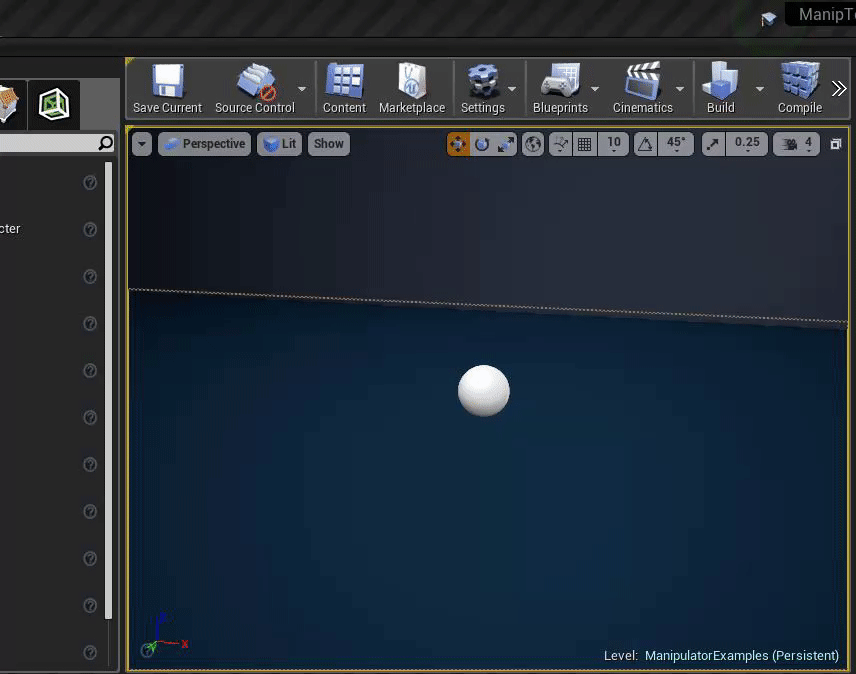
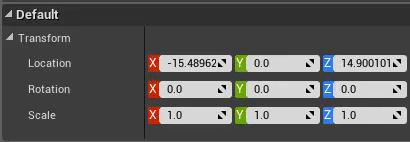
Notice too that the Transform Values in the details panel will change according to the manipulator's location relative to the actor.
From here you can do wayyy more stuff but this now will give you the ability to control other things in your blueprint via the construction script or Editor Tick!
Property Settings

Name to Edit - The name of the Property you would like to edit (It has to be instance editable and fit within one of the 4 types)
Type - Specifies how the manipulator will react according the type that its set to. This must match to work properly!
---- Transform - Behaves as you'd expect to be able to move, rotate, scale the widget.
---- Vector - Only allows movement on the widget.
---- Enum - Constricts the movement based on the movement settings as a slider to change the enum value. (This might be an actual visual drop down later or some sort of picture grid, the goal was to have a faster way to scrub through enum values.
---- Bool - Acts almost like a push button that changes color based on being true or false.
Index - For properties that are an array, this specifies which index specifically it will manipulate on that property.
Enum Settings
---- Step Size - How many unreal units to allow drag before changing the enum value.
---- Direction - Which axis to slide along
---- Enum Size - How many items are in the enum (Maybe in the future this can be automatic)
Draw Settings
This is how the manipulator will render on the screen. You can see that when there is nothing in it, the default will be a Blue Cube.

Base Color - The Default color of the manipulator
Selected Color - When the manipulator gets selected, it changes to this color
Overall Size - A multiplier that allows you to scale the manipulator's size very quickly
Offsets - If you want your manipulator to have some sort of default visual offset from its actual data, then this is where you can do it. This is an array of transforms that will compose with each other in the order of the array. This means that you can do some really cool relative offsets to make manipulators follow certain objects. You can do this by hand OR with some nodes (Those are outlines a bit more below)
Offset Example: This shows how a manipulator can be setup to visually follow another transform.

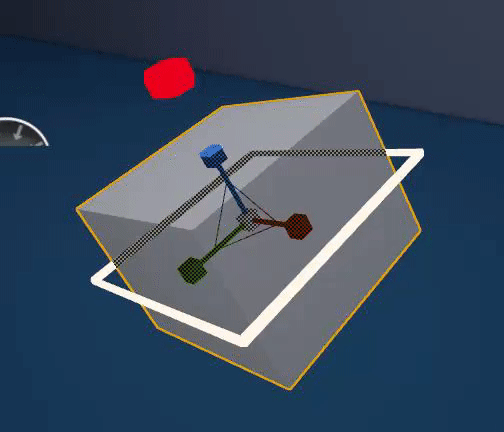
Shapes
The shapes section are 4 different arrays for any amount of shapes you'd like your manipulator to be made up of. This allows you to mix and match and offset them in order to get the manipulator to look how you would like it to look. Once you get a shape you are happy with, you can right click the "Shapes" struct and copy and paste to any other manipulator.
There are 4 supported shapes.
Wire Boxes

Diamonds

Circles

Planes / Custom 2D Material

Each shape has its own settings which should be pretty straight forward. The exception being the "Plane"
For Planes you have to use a specific material setup in order to get your custom materials to show up. This material is actually included in the Manipulator Plugin's Content Directory. To find it you can search for MM_ManipulatorTools_ShapePlane and either child class from it or copy it in order to make your custom material work on the Manipulators.


Finally you can see here the power of the shapes working together to make very useful visual manipulators.

Draw Extras

Depth Priority Group - Tells the visuals how they should sort with other objects in the scene. This is useful if you want manipulators to sort as if they were another object or to always be drawing on top of everything.
Use Property Value as Initial Offset - This is enabled by default and is mainly used for Transforms and Vectors. It will automatically set the visual offset to match the property's values. If you uncheck this, then you have to do everything manual which can be useful if you wanted to do World Space Based Manipulation!
Use Attached Socket as Initial Offset - If you attach a manipulator component to a socket on an object (Skeletal Meshes Sockets are joints), then this will automatically put your manipulator visually starting where that socket's location is. This is useful if you want to quickly do manipulation for a rigged object.
Use Zoom Offset - Will attempt to scale the manipulator counter to the viewport zoom to maintain its size in the viewport.
Flip Visual XLocation - Flips how the XLocation reacts so that it is mirrored from the data.
Flip Visual YRotation - Flips how the YRotation reacts so that it is mirrored from the data.
Flip Visual XScale - Flips how the XScale reacts so that it is mirrored form the data.
Constraint Settings
Hopefully this is also pretty straight forward. This restricts movement on manipulators to a certain limited constraint.

How to manipulate manipulators via blueprint.
Finally, now that you understand how a manipulator is setup and what the individual settings actually do, lets go over a few key useful blueprint nodes for them.
Editing Settings
The easiest way to edit settings is to just directly modify them via the "Set Members in Struct" nodes. These nodes allow you to select which pins are actually being modified in your struct.

Offsets can be adjusted via blueprint as well do handle bulk adjustments of how manipulators should follow other manipulators.

You can also add Manipulator Components In the Construction Script.

Draw settings can be queried and edited on the fly as well. This can be super useful to adjust how a manipulator looks based on what happens a certain value is changed.
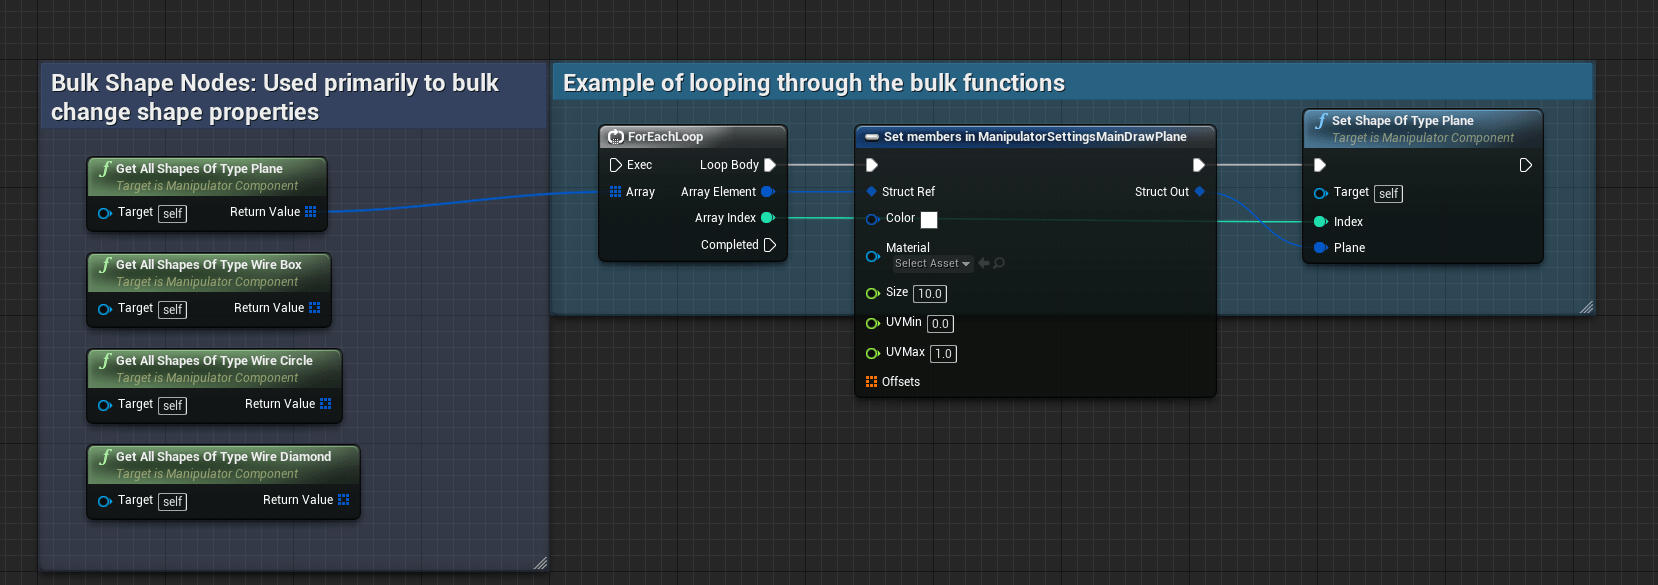
Shapes can also be changed individually instead of from a giant array if you know which index the shape is.


And Finally you can control and query selection of manipulators from blueprint!

Summary
Hopefully you get a pretty decent idea on how to make manipulators for your blueprint tools now. This is something I hope others can try out for themselves and really make some more functional tools in blueprint!